Blender 3D
A basic, basic fluid simulation demo in Blender
Note: this information is outdated now as it uses Blender 2.79. This post contains some notes on my beginning exploration of fluid simulations in Blender open-source 3D modelling and animation software. As with a lot of things in Blender, fiddling around intuitively with controls doesn’t quickly converge on the desired result! This stems largely, but not entirely, from the incredible flexibility of the program. There are a lot of options.
Blender’s documentation is looking very good these days, and I recommend having a skim of the relevant page in the manual when trying something new. So if you’ve never done a fluid in Blender, you’d have a look at https://docs.blender.org/manual/en/latest/physics/fluid/index.html.
I’d actually suggest reading that instead of this page.
I’m writing this now anyway, because the point of view of a person discovering how to do something is very different from someone who has already learned, and that shift can happen quite fast. I’m trying to capture the points that I initially found elusive, before they look too trivial to write down. Perhaps this page will help someone click on one of the concepts. If not, at least writing it helps me to solidify my own understanding.
Overview
To end up with a picture or animation of a fluid, the essential steps are:
- Create the necessary objects for the simulation, and configure their properties
- Bake the fluid - that is, run the calculations of the motion of the fluid
I’ve also done some (inexpert) rendering to show the results of the fluid sim. Rendering is a huge topic on its own. You can check the baked simulation in the viewport before rendering, though.
1. Create objects
Various objects can be taken into account in calculating the motion of a fluid. At minimum, to run the simulation, we need two objects:
- The Domain object, which acts as a container for the simulation, and
- an object to define either the initial liquid shape, or the shape of a liquid source.
Other objects that can interact with the fluid (including collision objects) are covered in the manual under Fluid Types.
To include an object in the fluid sim, we go into the Physics tab (bouncing ball icon) and tick Fluid. Options then appear, beginning with the Fluid Type.
In my minimal example, I set up a rectangular prism as the fluid domain (designated as such by giving it Type Domain), and inside the domain, a low-resolution UV sphere as the starting liquid “ball” (Type Fluid).
Here’s the setup before running my simulation:
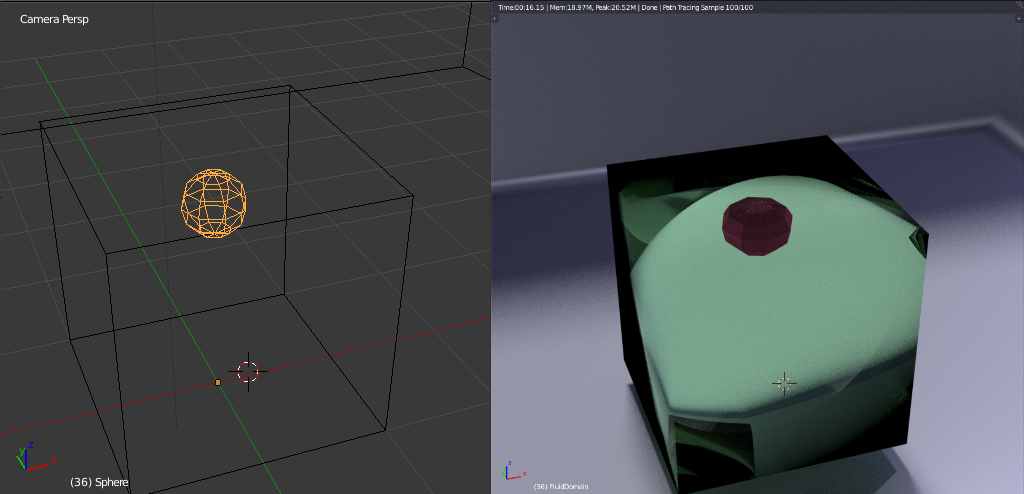
Left: Wireframe view of the fluid starting shape within the domain object; Right: Rendered view. The domain object is made of the material we want the fluid to have in the render. The material of the fluid object would often not even matter as you’d hide it after getting the simulation baked.
Notes on the domain object:
https://docs.blender.org/manual/en/2.79/physics/fluid/types/domain.html
- Whatever shape the domain object has, it’s the bounding box of the object that will be used to limit the simulation space.
- The material assigned to this object is the material of the fluid in the rendered image.
- If the fluid reaches the walls of the domain, the domain wall contains the fluid - it bounces off, sloshes at the bottom, etc.
- The “Real World Size” you specify under “Fluid World” in the Physics tab assigns a height to the vertical (z) dimension of the domain object. If I set it to 2m, the domain is 2m high, and that gives a scale to all the physics (including acceleration due to gravity) affecting the fluid.
- Fluid viscosity can also be adjusted under “Fluid World,” but I did not change this from the default, which nominally corresponds to water.
- The rest of the Fluid Physics settings can be left at the defaults for this simple demonstration.
Notes on the fluid object:
https://docs.blender.org/manual/en/2.79/physics/fluid/types/fluid_object.html
- Under the physics tab for the object, activate the “Fluid” button and choose a “Type” from the dropdown.
- Under Volume Initialization, I chose
Volume. - I used X, Y, and Z Initial Velocities of 0: gravity moves the fluid in this sim.

In this case, for the Type, I chose Fluid, which means that my simulation will have a fixed amount of fluid in it, beginning with the shape and position of my UV sphere.
Baking
“Baking” is running the simulation itself. The options for baking are set in the Physics tab of the domain object.
All the “chunks” of the fluid (how many there are depends on the resolution you set for the domain object) need their positions and velocities calculated at each frame, and they all have to take their neighbours into account to some extent (I haven’t looked into the methods so I don’t know to what extent). This adds up to a lot of calculating, and can take some time and RAM to complete, even for a fairly simple scene.
Parameters in this demo:
Domain object Fluid Physics parameters:
Fluid:
- Final Resolution: (varies)
- Render Display: Final
- Viewport Display: Preview
- Time Start: 0.000
- Time End: 3.000*
- Generate Speed Vectors: Off
- Reverse Frames: Off
- Speed: 1.000
- Offset: 0
Fluid World:
- Use Scene Gravity: Enabled
- Viscosity presets: Water (Base 1, exponent 6)
- Real world Size: 2.000m
- Optimization: Grid levels -1 (auto); Compressibility 0.005 (default)
Fluid Boundary:
- Slip type: Partial Slip; Amount 0.200
- Surface: Smoothing 1.00; Subdivisions 0
- Remove air bubbles: On
Fluid particles:
- Tracer: 0
- Generate: 0.00
In the Render tab, the framerate was set to 12fps, so this results in 36 frames being calculated. I do have a suspicion that, depending upon other parameters, this may give an excessively large step size between calculations, which can lead to complications. It worked all right in this case.
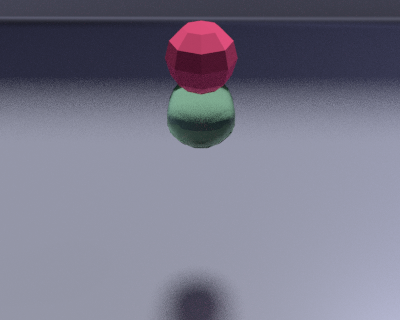
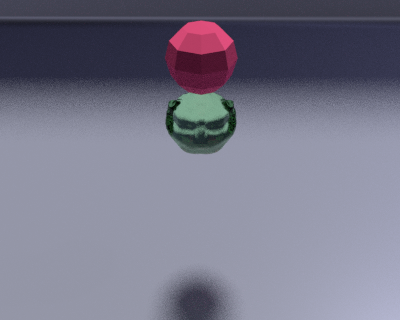
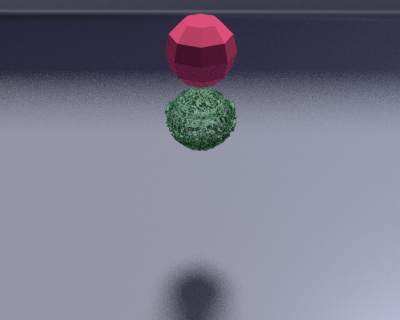
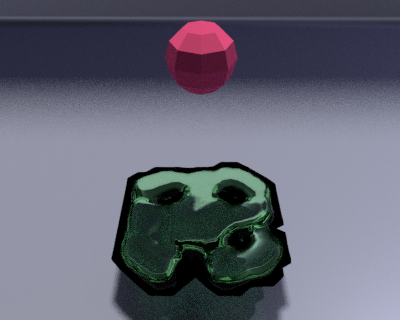
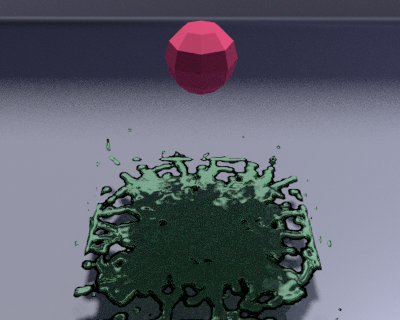
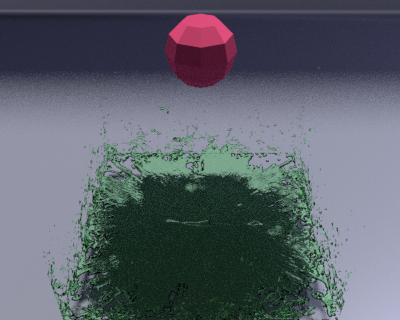
Examples of different bake resolutions
| Resolution 24 | Resolution 100 | Resolution 400 |
|---|---|---|
| Frame 4 | ||
 |
 |
 |
| Frame 9 | ||
 |
 |
 |
A GIF. Resolution 400.
Other notes
- You can’t currently make two interacting fluids (e.g. two different colours mixing). You can bake two fluids separately, one after the other, and there’s a clever use of the boolean modifier in this example of an egg dropping into a frying pan.
- I haven’t found a way to make the fluid splash off of the floor. I don’t get splashes until the fluid hits the side walls of the domain. It looks good and splashy once the bottom of the domain is full and it all starts sloshing around.
- The fluid “particles” or blobs? seem to jiggle around on their own. The dropping ball of fluid starts to slosh without external forces, and once there are blobs on the floor they wiggle and twitch like cornstarch on an audio speaker cone. The higher the resolution of the bake, the less conspicuous this seems. This may be the developers’ way of introducing a bit of “life” to a fluid. Just conjecture.